Wednesday, January 30, 2013

Milk Paint Furniture Redo

Whenever I am in a creative slump, I end up doing some sort of creative project around my house that gets the excitement and ideas flowing again....and this month, I decided to do an antique redo of my coffee and end table in my living room.  My friend told me about the amazing qualities of chalk paint (not to be confused with chalk board paint), by Annie Sloan, and in doing more research, I also found another antique-type paint called Milk Paint.  It's actually the type of paint people used to white wash fences or paint walls before all of the new latex and commercial paints were on the market.  I love the fact that it's virtually zero VOC, natural paint that uses none other than milk and hydrated lime!  So, I wasn't set on using milk paint over chalk paint, but when I visited my local antique market last week, I saw that they carried milk paint, so I just had to buy it!  I bought a creamy color, as well as a bonding agent to help the milk paint adhere to my already painted surface.  Yeah, milk paint will stick like a stain to unfinished wood, but if your piece is already stained, painted, poly'd, etc., you may need to add the bonding agent to your milk paint to keep it from totally peeling off. 
 
About that peeling....milk paint will give an authentic antique look because it chips off the surface of finished or painted objects.  It is unpredictable, so there is a partial gamble when you choose to use milk paint.  I had to use the bonding agent because I had painted my coffee and end tables black.  My goal was to have the black show through the spots that the creamy milk paint chipped off.  
Here is my milk paint:
 
 
Milk paint comes in a powder form that you mix with water.  It's perishable because it's, yanno; made with milk.  The best part is that you can mix a little at a time, so you can make your milk paint last a long time!
 
Here is my project: black end and coffee tables that were originally oak or something like that. :)  These were college hand- me- downs so I've never been afraid to "play" with them...before the black, I had painted some swirly floral pattern on it in college.  And, now they are onto a new phase of life- antique cream.
 
There isn't a need to sand with milk paint, but I did use the bonding agent since my surface had been painted first.  Here is the table after the first coat...pretty streaky, but that's normal.  You can also see all the funky distressing in the wood courtesy of my 3 and 5 year old over the years.  at least it fits the antique look!


Covering this black took more coats than I anticipated.  I could have actually done another coat, but after a second trip to the antique store to buy another pint of paint, I made the executive decision that three would have to do.  If you aren't covering a dark surface, or you're using a darker color milk paint, one or two coats usually does the trick.  After it was completely dry (2-3 hours after it's painted), I sanded with pretty gritty paper, as well as scraped very lightly with a putty knife along the edges, and anywhere that kind of "bubbled" up.  This bubbling where the paint doesn't adhere to the surface is what gives you the chippy look.  Unfortunately....wait for it...I had a major craftastrophy.  I made the mistake of not sanding my end table before I painted it black.  So, even though I used the bonding agent in the milk paint, (which stuck beautifully to the black paint), it unfortunately pulled the black paint away from the wood.  This is what happened:
 
I scratched as much paint off as I could, sanded the entire thing till I broke a sweat, and made yet another executive decision (that I half way regret now) to not repaint it black, but to just paint it with the milk paint.  I didn't want to have to buy more milk paint for this project, and I was running short on the amount of time I could stay sane with a torn apart living room.  That reason is enough for me not to care that it doesn't have black like the awesome coffee table, and it still looks cool.  So, here they are; painted and sanded, looking all antiquely amazing. 


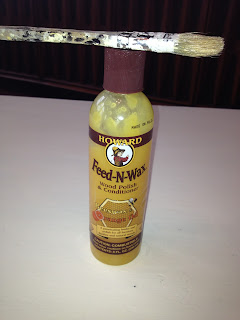
 Last step: waxing.  Waxing protects the milk paint similarly to a polyurethane.  You can use dark waxes to add more drama to your pieces, especially those with intricate woodworking details.  I wanted to keep my furniture light, so I used this nice beeswax with orange oil.  Again, a low chemical formula, so I could feel good about using it in my home and not use a gas mask. :)  It intensifies the colors beautifully without actually changing the color.  I did 2 coats of wax, letting them dry between coats, and three coats on just the top of the coffee table since it gets so much abuse. 

Here is the *almost* finished living room!  I still need an area rug, and a few other things...but I do love the new look with the lighter tables.  There was too much black before!
 
 
What's inspiring you these days??
Happy Crafting!!!
Love,
Anna


Tuesday, January 29, 2013

Tuesday's Real Food Recipe- Downtown Chicken Enchilada Lasagna

I'm excited about today's real-food recipe because it brings me back to one of my favorite dishes of my mommy's!  She always made such yummy dinners, even while working full time, and we almost always ate together as a family.  I know I'm blessed to have had such a great example, and guess what?  My family is close and functioning, partially due to those family dinners, I am sure. 

The yummy dish that was a favorite among the fam?  Downtown Chicken Enchiladas.  They aren't your traditional enchilada with the red sauce- it's actually a creamy chicken-based sauce, and quite unique and simple.  My husband is always thrilled when I make this, but I rarely do because it is an absolute MESS to make!  Dipping each tortilla in the cream sauce and layering cheese inside, rolling them up- my goodness!  I feel like I'm at a pottery class!  Especially when I need to be ready at a moments notice to referee my kids, or answer the phone, etc.  I am sure my mom had some fancy technique that was neater than mine, but I came up with a great way to tidy up this process while still keeping the dish very similar, and tasting the same.  Turn it into a lasagna!

Downtown Chicken Enchilada Lasagna


So, here is the list of ingredients:

*about 1.5 cups of either homemade cream of chicken soup, or the best store bought one you can find (regular soup has nasty msg and BPA in the can- not what I want to add to my real food dinners!)
*3 or 4, 8 inch tortillas of your choice.  Homemade, soft corn, soft flour, sprouted
*1 lb. chicken (white or dark meat, and preferably free range/organic)
*8 oz. each of pepper jack and monteray jack cheese
*1 jar or can of black olives (I like Lindsay's Naturals when I can't find them in glass jars)
*1 Serrano or jalapeno pepper, broiled, skin removed and diced
*1 small onion chopped and sauteed
*Greek yogurt or sour cream
*salsa
*butter for greasing your 8x8 dish

Grease an 8x8 casserole dish.  boil chicken and shred with a fork or in your stand mixer with a paddle attachment.  Pour the chicken and the cream of chicken soup into a bowl or pan.  Place your hot pepper under the broiler and turn so each side is charred, about 3 minutes.  meanwhile, Chop and saute 1 small onion in olive oil or butter until soft, about 3-5 minutes.  Now, I am the queen of forgetting the onion.  I probably forget it 90% of the time, and it still tastes great without it.  So if this recipe seems like too many steps, meh- cut out the onion. 

When the pepper is charred, remove from the broiler and let cool until you can handle it.  Place it under running water and the skin will peel right off.  Carefully remove the seeds (you may want to wear gloves if you're dealing with really hot peppers), and chop the pepper and black olives.  Add the pepper and olives to the cream of chicken soup, and mix well.  Grate your cheeses together onto a plate or bowl.  Only use monteray jack if you don't like things spicy, or use ALL pepper jack if you love the little happy slap to the soul like I do. :)

Preheat your oven to 350.  Place a small amount of the cream of chicken soup in the bottom of the greased dish like you would if you were making lasagna.  Place one tortilla in the bottom, and add about 1/2 in. layer of the chicken mixture on top.  Add a layer of cheese, and then place another tortilla on top.  Repeat.  You will probably have enough room for 3 layers if you use a regular casserole dish, but may have room for more if you use a deep covered baker or something similar.  End with the chicken and cheese layer on top. 

Bake in a 350 degree oven for about 45 minutes or until your cheese is golden brown on the top.  If you are making this in a deeper dish, you may want to bake it for about an hour.  The chicken is cooked, so you really just want to heat it through and brown the cheese on top. 

Serve in squares, and garnish with sour cream and salsa. 

This may seem like a rich dish to you with all that cheese, but i'm telling you, this is the best comfort meal when you want something a little sassy!  And, you can always use less cheese if you want to make it lighter.  It seriously warms the soul and is always a family favorite!  Serve with chips, guacamole....you know what you like!  Make it fun!


Happy Cooking!!!
Anna


Tuesday, January 22, 2013

Real Food Tuesday!!! Juicing Power!

Why, hello my long lost readers!  I've been getting back into the swing of life after the holidays, and unfortunately i've been hit with the post-holiday writing slump.  I even went to a coffee house to write some children's book material last week in hopes that the creative ambiance would help me reach a new level of writing nirvana, but I left with pretty much nothing.  I guess we spend a lot of creative juices over the holidays, coming up a little dry in January! 

I had a friend ask if I would do a blog about juicing, so here we are.  My fabulous hubby bought me an Omega juicer for Christmas!!  Hip hip!  I really wanted to add more raw veggies into my diet, and not all veggies work well in a smoothie.  I mean, carrots and celery smoothie?  Chunky ewwww monkey.  So, I can't wait to tell you how it's going, and especially about the surprise side effect I've had since we started. 

when we returned home from our Christmas trip down to Florida, I started juicing for my family every morning.  A nice mix of fruits and veggies, and I absolutely LOVE it.  The Omega Juicer, (find it at Amazon here: http://www.amazon.com/Omega-VRT350-Dual-Stage-Vertical-Single/dp/B00434JINO/ref=sr_1_3?ie=UTF8&qid=1358867893&sr=8-3&keywords=omega+juicers), is a heavy duty juicer that has a cool motor, so it doesn't kill sensitve enzymes and also helps extend the life of your juice if you want to juice for two days at once, for instance.  There are a few parts, but I find it easy to clean and put back together.  I keep the juicer out on my counter, and I haven't found it inconvenient at all. 

My go-to juice has been half carrot, half citrus just because I brought home practically every available bag of oranges and grapefruit at the fruit stand when we were in FL, and not to mention, it's been perfect to shorten our winter colds and has kept us healthy with all of the vitamin C, A (and D from some nice sunshine outside this winter)!  I have also enjoyed green juice, which is a mixture of kale, celery (watch out, the celery flavor is strong!), cucumber, broccoli with an orange or apple tossed in for sweetness.  I also will add some fresh lemon juice to the veggie- heavy juices, which seems to give it that extra bit of brightness and makes it taste better. 

Really, you can try any combo you want: I have added tomatoes and kale to the orange/carrot mixture and both worked out well.  Whatever I have on hand, I throw in!  You need a LOT of green to make a lot of juice, whereas a grapefruit yields the most juice, surprise surprise.  However, I figure I am getting straight nutrients to my body, so even if it's not a full glass of green juice, it's still providing my body with the best medicine!

One side effect to all of this juicing was quite unexpected.  As many of you know, I am currently expecting my 3rd baby, and I am 29 weeks along.  Pretty much the entire fall through Christmas I was struggling with what seemed like a severe case of pregnancy depression or anxiety.  I never went to the Dr. for it, but man- I was an overwhelmed MESS!  So, miraculously, the DAY AFTER I started juicing, my depression went away entirely.  Like, boom. Done. Gone.  I was so excited and grateful that it went away, but I am sure my poor kids and husband are even more glad.  Now, obviously this isn't some huge scientific study or anything, but in my experience, I feel so much better!  What a great motivation to continue the juicing!  Mind you, I was eating a healthy, real food diet before, so it's not like I switched from eating fruit loops every morning to healthy juice- juice was just something I added to an already healthy, whole food diet, and it has really made a difference!

We still eat fruit and veggies whole or in smoothies for variation and fiber, etc. too. 

So, if you've thought about juicing, I do highly recommend the Omega Vert Juicer, and juicing in general. 

Here's to your health!!!!

Love,
Anna